Showing posts with label beadwork. Show all posts

Thursday, October 22, 2015

Two of my "in progress" art quilts

I cannot believe my favorite upholstery store is going out of business!!  This store was a hidden gem for me.  When one first enters this shop it seems pretty small, then there are swing doors to the second part of the store.  The first room housed most of the upholstery, the second room had mainly trims and tassels.  Then there was a third room in the back!  This is where I get super excited because they have bins and bins and bins full of remnants... CHEAP!  When I started making art dolls years ago I would use these remnants as their clothes.  Some upholstery is very textured and rich in colors and there are different types of patterns that you can't find in a traditional fabric or quilt shop. 

Since my artistic endeavors change like the wind I can usually find various uses for my art supplies.  Sometimes if I'm working on two different projects in two different mediums they will overlap, hence my love of art quilts.  Art quilts combine traditional quilt methods with a modern twist, usually adding unexpected objects to beautiful wall hangings. And this is where my ideas overlap... I could use my upholstery remnants as a base to creating unique one-of-a-kind art quilts!

This was one that I started a few months ago:
Of course it was 2-D until I added beads, yarn, ribbon and puffy paint to it.  I also made some of the centers stand out by using extra upholstery and stuffing it with cotton.
Then I found some of my old sculpey beads that go almost perfectly with these colors!  I probably made these in the early 90's.
(circular bead in the bottom right hand part of the photo)
Again this is not finished yet.

Last week when I went to this upholstery shop again (they aren't closing until at least December) I found this remnant that I fell in love with!  The moment I saw it it inspired me.  The dark brown part of the leaves are velvet and feel oh so soft!  Here was the picture I took a few days ago after quilting it and hand sewing a row of gold beads:
As you can tell by the photo there are gold accents on the beige background part of the upholstery.  When I quilted over this it seems to disappear so I wanted to make that stand out again... fabric markers to the rescue!  I have also added decorative yarn and turquoise beads.

I have a huge collection of beads and usually I can find the right colors to go with my projects.  Here is a photo of everything I've used so far:

As with the first one posted here I like to work on these for a while then walk away for a few days. This is why I could never be on Project Runway, sometimes they only have one day to complete a challenge!  Anyway, when I return to a project it is with "new eyes" and I am able to be inspired again.

Saturday, February 14, 2015

Jewels for the Wall

For Christmas I received a subscription to Quilting Arts Magazine.  I love this magazine because it combines quilting with other mediums (right up my alley!).  I started making art quilts about 1-2 years ago, embellishing with found objects and beads.  This magazine shows me how to create my own fabrics with dyes, stamps and silk screening.  An article in the December2014/January2015 issue entitled Jewels for the Wall by Natalya Aikens inspired my next creations.  She made mini art quilts, framed them and then painted the frames to match the colors in the quilts.  Mine, of course, looks nothing like hers but that's the beauty of art!  Every artist has their own talents and interpretations of their world.

This was my very first one:
I only used fabric, beads and paint.
And because I love owls this was my second one:
For this creation I used fabric (the owl), upholstery (the gray background and the blue branch) and puffy paint (little designs coming off the branches).  There are also beads sewn on the eyes.
My third one is my absolute favorite because it's not as tight or structured as the last two.  I call it Steampunk and Butterflies.
(again I used fabric, upholstery, beads, clock parts and other hardware)

(top part):
(bottom part):
This is the start of two new creations.  I will be embellishing with seashells, sea grass and of course more beadwork.  The horizontal frame will be the seashore and the vertical frame will have lighthouse fabric in it.
These and many more creations will be for sale in my booth at the Newport News Fall Festival of Folk Life first weekend in October, please come out and see me!

Wednesday, November 19, 2014

The start of my Nutcracker Art Quilt

I love art quilts.  I love making them and I love looking at them.  Sometimes an art quilt contains embellishments such as beads, ribbons, found objects and things from nature.  A few months ago I started hand sewing beads onto one of my art quilts and I LOVE how it is turning out.  Granted it is taking a while but it is totally worth it!  

After deciding to embroider the centers of my Block of the Month blocks (see last post) I have really embraced this type of needlework.   I love it because to me everything about embroidery is creative, I can draw my own pattern and I can use any colors I want.  If you can't draw, or need ideas, all you have to do is search "coloring pages+mermaids" or whatever you little heart desires.

About a year ago I found this Christmas fabric on sale.  I traditionally like red and green but this one really grabbed my eye.

I had not known what I was going to do with this fabric until a few days ago.  Along with peacocks, mermaids and Halloween I also like nutcrackers (like mother like daughter!)  I found a line drawing of a nutcracker online and have decided to embroider him in blues and greens.  He will then be the center of one of my art quilts with this fabric being one of the borders and maybe the backing.

I love adding sequins and beads to make it really "sparkle":
I purposely did not sketch in the eyes because I was going to use black beads and I didn't want the pencil marks to show but last night I had an idea, I may paint the eyes so I can get the tiny details.

This may be for sale at the Newport News Fall Festival next year or it may not depending on how much I fall in love with it.

Friday, June 13, 2014

Featured Friday Artist: Betsy Youngquist

I am a HUGE Pinterest person (you can find my page here).  I have a board called Art Dolls and Softees because not only do I design art dolls I LOVE looking at other peoples creative imaginations as well.  Be warned, on my Pinterest board I have pinned 579 pictures in this category alone! 

A few months ago I pinned this picture:
My first thought was "How did she do this?!"  I was intrigued by all of the beads and how they all just made sense, the colors, the placement, the sizes, everything.  Then in the winter issue of Where Women Create she is a featured artist!  I was so excited to learn more about this very talented lady, Betsy Youngquist. In the article her work is described as "Betsy's work reflects a fascination with the intersection of humans, animals and mythology.  Stemming from a  lifelong love of all creatures great and small, her work weaves together the human and animal spirit."

Here is a link to her website if you would like to find out more about this very talented artist: Betsy Youngquist.

And here are just a few more of her designs:


She also sells her work on Etsy at: Betsy Youngquist Beaded Mosiac Sculpture

Wednesday, April 17, 2013

Update on my Hoffman Doll challenge

Well I'm coming right along!  Because I have two young boys I'm not able to devote as much time to working on her as I would like but "where there's a will there's a way!"

As you remember these are the Hoffman Fabrics for the 2013 Challenge (except for the teal one):


Step 1  Body finished
After sewing her body I decided to add lace around the bust line to give her more curves.  Her necklace is made out of seed beads and an old earring.
 
Step 2 Legs and shoes finished
The legs are made out of one of the Hoffman challenge fabrics then I painted the shoes and laced them up with gold ribbon.  The soles and heals are painted brown.  Later I may add more embellishments to the top of her boots.


The most fun I've had with this challenge is creating the skirt. I first thing I did was to create a crazy quilt with the challenge fabrics. I then started embellishing the seams and creating decorative designs within the blocks.


And just today I finished her arms, hands and shrug around her shoulders. I have taken these photos because I'm so excited about her but her skirt isn't finished and not even attached yet! And of course she needs a head (which is still waiting to be stuffed). But this is a first look at what I've been working on these past few weeks.
 
 
Her left hand is "palm open" because she will be feeding an animal but I'm not going to tell you what it is yet incase it doesn't turn out.

Wednesday, July 11, 2012

Another Felt and Fabric Applique Piece

Under The Sea felt and fabric applique and embroidery is finally finished, hooray!!

To remind you, this was a photo of it almost completed but I still had to finish the embroidery inside the seaweed plus add more beads and shells:
I added little red pearls to the red fabric coral (and black beads to the fishes eyes).


See if you can find five real seashells:
Give up???
.
.
.
.
.
.
.
.
.
.
.
.
.

I also added more blue beads to the two blue waves at the top; and if you look closely I used green AND blue metallic thread for the seaweed embroidery.
This is now hanging in my studio space (and is for sale) at Olde Towne Art in Portsmouth, VA.  Under The Sea measures 20" X 24"

Thursday, May 31, 2012

Doing a lot of hand sewing these days

I think the reason why I haven't posted in a while is because hand sewing takes awhile!  I am still in love with felt and fabric applique and this is what I am now doing most nights after my boys go to bed. 

I haven't worked on this project much more except for sewing blue beads into the water pattern and a few pearls into the rocks and shells at teh bottom.  As you can tell I still haven't finished the metallic green embroidery work in the the coral.
The reason why I haven't finished my underwater project is because I've been spending time In My Flower Garden.  Please don't be fooled, I don't have a green thumb... I've been creating a felt garden.  This was the the beginning stage:
I mount my finished pieces on stretched canvas (like I did with Gypsy Love) so that's what the white chalk outline is for.  This piece will eventually measure 8" X 10".

If you have been reading this blog for a while you know how much I love buttons and painting on them.  So after I cut out these designs I found 5 of my painted buttons that I thought went pretty well with the colors of felt I had chosen.  Then... let the hand sewing and embroidery (and bead work) begin!!

And this is my newest piece I finished a few days ago.  In My Flower Garden.
Close up of details:


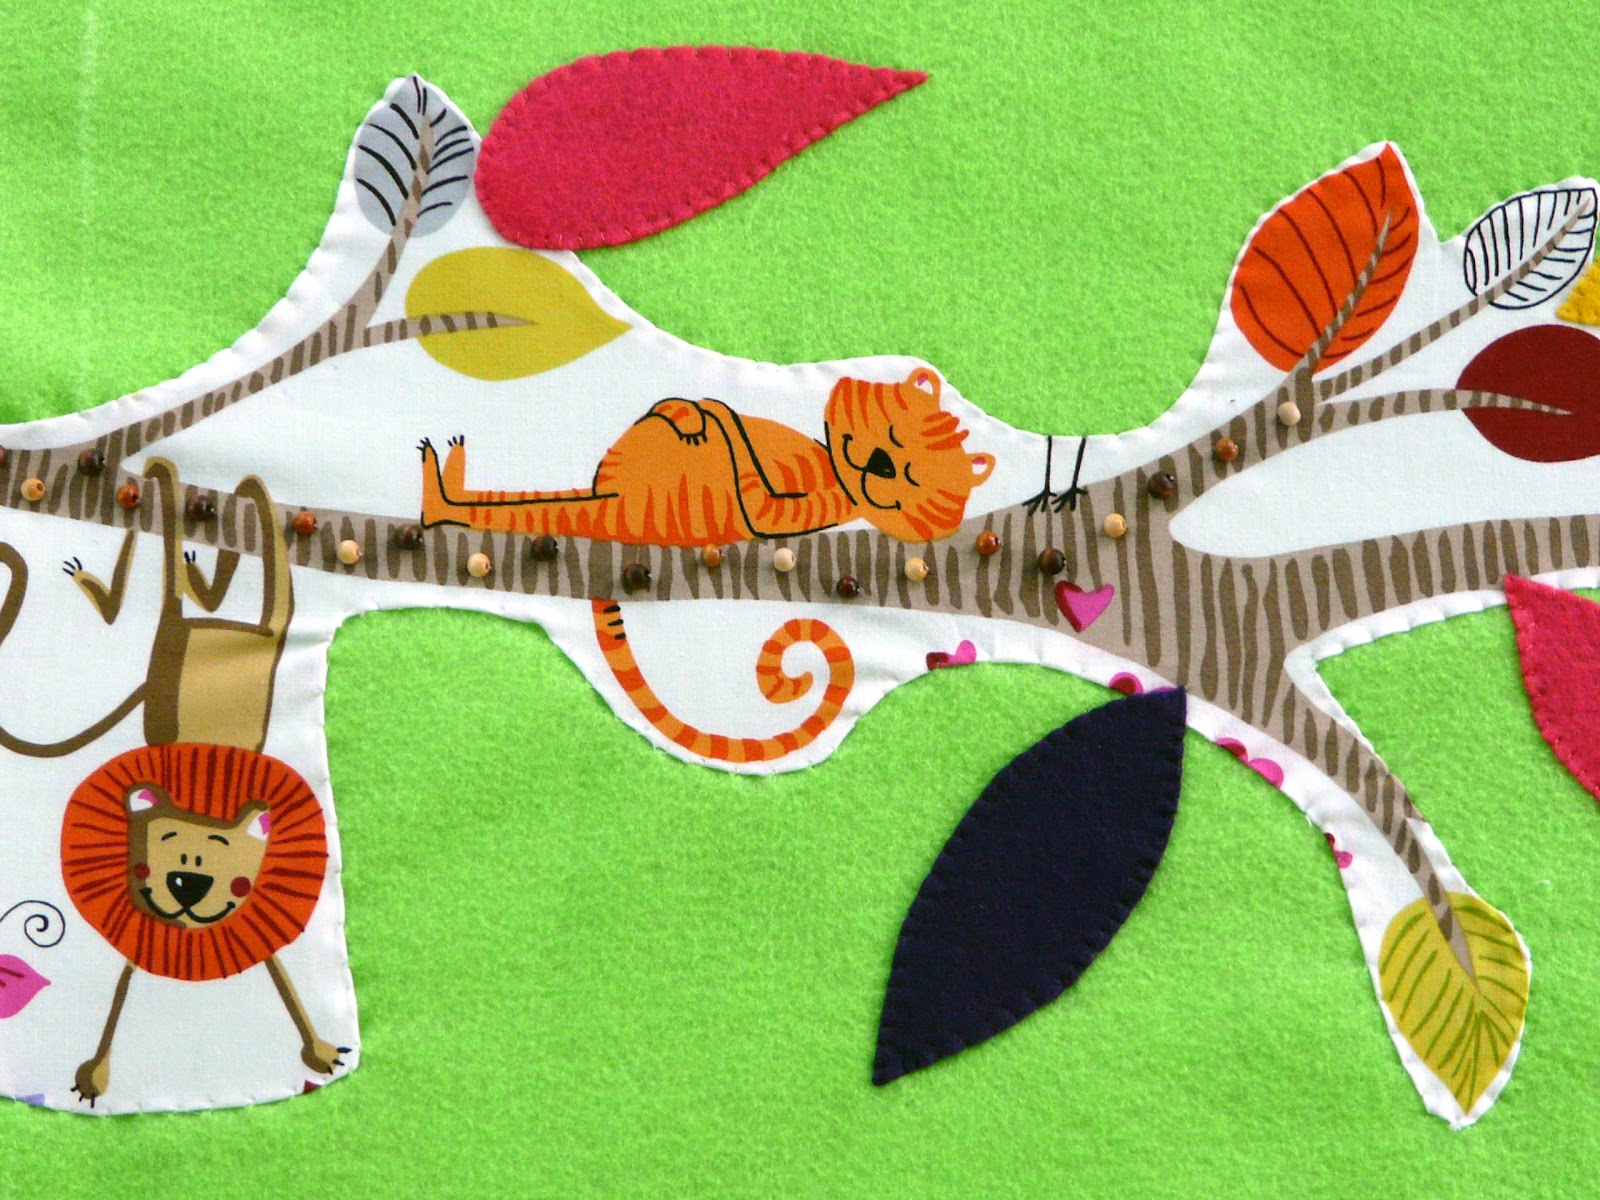
And right now I would get back to my underwater felt applique but I found this adorable fabric the other day that I knew immediately what I was going to do with it.  First it involved making a 40" X 12" frame, buy felt to cover the frame then start appliqueing!
The cat laying on the branch on the left hand side caught my eye in the store.  Again if you see the white chalk lines, this is where the felt will be wrapped around the canvas.
I have also added 7 felt leaves to fill it in and to have fun doing bead work on them later.  Inspiration will be taken directly from the leaves in In My Flower Garden.  The two dark leaves are purple not black as they appear.
The only work I've done on this piece so far, besides sewing everything down, is to start sewing wooden beads onto the branch but I have lots more to go so stay tuned!