Showing posts with label masquerade masks. Show all posts

Tuesday, January 30, 2018

Quilt Guild Challenge

I belong to my local quilt guild in Lexington, VA (Rockbridge Pieceworkers Quilt Guild) and this year we did the two-color crayon challenge.  This was a lot of fun because the two colors I got could not have been more appropriate for me...
PURPLE AND ORANGE!!!
What luck because my favorite holiday is Halloween!  We could also add black, white or beige to our quilt but at least 51% needed to be our chosen colors.

Anyone who follows my work knows that I'm an out of the box thinker when it comes to my artwork.  I have made traditional quilts in the past but I consider myself a textile artist who creates art quilts; wall hangings that incorporate various textiles and most of the time an "unusual object" of some sort.

With this in mind, I went to Pinterest for inspiration.  I found a watercolor and ink painting of a female in a beautiful ball gown.  That was it!! (Pinterest link)  Using my purple and orange colors, I was going to transform this girl from a stunning blue dress to a Halloween Masquerade Ballgown!

I first researched the artist that painted "my inspiration" and her name is Inslee Haynes (or Inslee Fariss).  She is a New York City-based artist and illustrator and she can be found at Inslee By Design.

I then graphed the design to the largest size I could without going over the requirements for the challenge (100" perimeter)

My next step was to cut out my pattern and quilt a background for her.  I found this chandelier fabric at Walmart (cringe!) and I went into my fabric stash for the realistic looking wood fabric.
The quilt peeking out from the right is my Steampunk quilt

Next, let's start designing her ball gown!  Ball gowns are traditionally "pouffy and sparkly" and I enjoy beadwork and embroidery so I knew this was going to be the focal point of my design.  I went through my stash of orange and purple ribbons, beads, embroidery floss, felt and paint.  I then sat for a few days looking at what I had... waiting for inspiration.  I always tell my husband that I could never be on Project Runway because they have no time to sit with their project, they just have to cut and sew and cut and sew.  I am a slower designer.  I have to do a few steps then let it hang there for a few days and even maybe a few months!

Then inspiration hit:


We traveled (from Virginia) to Indiana for Thanksgiving and to Wisconsin for Christmas.  I needed handwork for the car and this was the perfect opportunity to finish her ballgown.

I used beige felt for her head and arms and permanent brown and black markers for shading on her arms and to draw her face.  I initially cut and sewed brown felt for where I was going to put her hair but I knew I would be covering up most of the brown felt with "3-D hair."

And then came the hair...(which I hand sewed in place)


Over the Christmas holidays, I found a white chandelier ornament that I wanted to use.  I wasn't sure how I was going to incorporate it into my quilt but it looked just like the printed background fabric.

Next came the paint and the clay.  I painted the chandelier purple and orange and added the same color beads.  I then made a masquerade mask out of orange and purple Sculpey clay then glued sequins to the mask and the mask to the stick.


Next the chandelier.  I knew where I wanted to put it on the quilt but it was big and bulky.  I remembered a wall hanging I made 8-10 months ago where I cut a hole through the quilt and strung a spider web through it.  Problem solved!

I felt like her hair needed something else, like a hair clip so something.  So I made this out of Sculpey clay also, the same material as the mask.


The challenge isn't until March's meeting so this hasn't been seen by anyone in my guild yet.  I hope that it has enough of the two colors for the challenge but if not it was a blast making it anyway.


Thanks for looking!

Friday, January 20, 2012

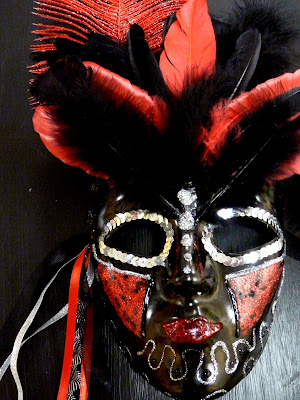
My parade of masquerade masks

One of those fun things I just had to try... then of course I got a little carried away with myself, and my feathers!


And my very favorite:


HAPPY MARDI GRAS!!!

And this is what they all look like in my studio space at Olde Towne Art in Portsmouth, VA.  Please stop by and feel free to try one on!

Tuesday, January 17, 2012

Updates, updates

This past week I could not wait to get started on my new endeavor: Chain Mail Jewelry!  After my last post I decided to go in a totally different direction and make a ring instead of earrings or a bracelet.  I used Rebeca Mojica's book Chained and made the Japanese Diamond Ring found on page 60.  It was rated as a mid-length project (it did take a few hours to complete) and rated as expert.  (There's nothing like aiming high on the first project!)It does state though that the reason for the expert rating is because one makes it out of stainless steel and titanium which are two of the strongest metals and working with them is tough.  Given this information I made mine out of a softer metal so I wouldn't get discouraged but knowing that it won't be as durable as if I had used a stronger metal.  I am absolutely thrilled with the results!
For this ring I used gold and pink jump rings for the center design and blue and green jump rings for the outside design.  The possibilities are endless when working with colored jump rings.  I believe my next project will be a helm chain bracelet in silver and black but don't hold me to it.

My second update is my Mardi Gras masks.  I have feathers flying all over the place here!  I have a total of 10 in the works, two are full face masks and the other eight are half masks.  I wanted to post a picture of my white and cream colored one because it is the first one finished and it's my favorite.  My goal is to finish all 10 by tomorrow and take them to my art gallery on Thursday so I can focus on my next endeavor: altered books and art journalling.  I've tried this in the past with not a lot of luck but I keep getting drawn back to it so we'll see.


Wednesday, January 11, 2012

Sometimes cheap isn't always better

While looking through my Oriental Trading Company's catalog I noticed some white masks... inspiration struck... "That would be so much fun to paint a mask and bejewel it".  Sounded very whimsical which is right up my alley!  I hadn't even looked at my local craft store for masks, I sat down and ordered them right then because when I have an idea I want to execute it right then and there, although I had to wait for shipping time.

When they arrived I wasn't impressed with the quality of the plastic but I pushed forward.  I went to my local hardware store and bought "plastic primer" which worked fantastic.  My problem was that the masks were still too flimsy.  I ended up going to my local craft store and found exactly what I wanted.  I wanted to do a full face mask but then I also wanted to do a few half face masks too. 

While I was at Olde Towne Art discussing my idea with other artists one of the ladies reminded me that Mardi Gras was coming up.  Wow I couldn't have timed that better!  So my ideas have shifted a little to now include feathers and and sequins.  My first thought was to do a full face white pearlescence mask with white feathers and lots of pearls. 

Here is my work table.  The champagne colored pearls laying across the mouth of the white face ended up outlining her lips.  I can't wait to post some finished photos!